Photography Tips: 8 Surefire Methods to Convey Depth
Photography Tips & Techniques: 8 Surefire Methods to Convey Depth in your Images
The challenge is this – how do we overcome the limitations of a two-dimensional medium (the camera) in rendering our impressions of a four-dimensional world?
Yes, I did say we live in a four-dimensional world; they are height, width, depth, and time. So, how do we go about addressing the challenge we face, given the limitations of our choice of medium – a single image rendered on a digital sensor or film? While the fourth dimension (time) is outside of the scope of this discussion (to be addressed in a future post), let us address the third dimension here – depth.
The challenge is not new, painters of yore wrestled with the same issues when it came to translating their impressions onto canvas. Obviously, a canvas is a two dimensional medium – anything rendered onto it cannot have depth, not literally at least. And so they figured that if they cannot reproduce depth, they could maybe do with substituting it with the illusion of depth…
They succeeded brilliantly, to the extent that their methods have been employed ever since, even in photography. Their methods could be summed up in one word: Perspective
What is Perspective?
Before we embark on a discussion on how to employ perspective in order to recreate an impression of depth in our images, it is natural that we first understand what the term means. Simply put, perspective is the set of techniques used for depicting volumes and spatial relationships on a flat surface. This might seem a rather vague definition -which it is – until we start looking at the individual methods (and I list eight here) to create the illusion of depth in a scene rendered on a two-dimensional medium.
For each of the methods I go on to discuss below, I provide an accompanying image that highlights the use of the method being discussed. As a matter of fact, each of the photographs will often use more than one method to create the illusion of depth; you’re encouraged to revisit each of the images and view them in greater detail once you’ve read – and understood – this post in toto so as to identify the many methods employed in each image.
Aerial Perspective
Aerial Perspective makes use of a phenomenon found in the natural world – atmospheric haze. The presence of haze tends to reduce contrast and at the same time lighten tones; of course, these tonal differences are reproduced in an image, and it helps us in no small measure.
Wired as our brains are, they always tend to relate things we encounter with the known, and when it processes a two-dimensional image in which it finds lighter tones with reduced contrasts, it automatically tends to relate it with depth. Depending on other elements in the image, the mind may then choose to outright reject this relationship, or – if backed up by other visual clues – reinforce it.

Note how aerial perspective lightens the shadow tones (the mountains) in the background, and reduces contrast between them and the highlights (the sky). Coupled together with the use of Diminishing Perspective in the image, it serves to create the illusion of depth.
Diminishing Perspective
The use of Diminishing Perspective in conveying depth in a two-dimensional image is again based on how we perceive the real three-dimensional world. You don’t need to look through a viewfinder to know that objects in the distance seem smaller than they really are; the further an object is from one’s viewpoint, the more it diminishes in size – this, in plain and simple terms is Diminishing Perspective.
At the heart of things, our eyes are nothing but cameras; light passes through a lens in the front before falling on a medium (the retina). Light-sensitive cells then send electrical impulses via our optic nerves to the optic lobes in our brains, which is where we actually “see” the image.
Camera lenses are no different from the lenses in our eyes – both follow the laws of optics. Which is to say that diminishing perspective occurs whether the image is falling on our retina, or on a digital sensor.
When objects that our minds can relate to are presented to it on a two-dimensional medium (a photograph) and convey diminishing perspective, our minds immediately attempt to form relations with what it encounters in our daily life. In this context, it screams “Depth”. Voila!

Tibet: The Changthang
Based on real-life experience we know that – despite appearances – the vehicles in
the middle-ground have to approximately the same size as the vehicle in the foreground.
We also know that the hill in the far distance cannot be smaller than the vehicle, despite appearing so.
The mind collates information, relates objects and concepts that we are familiar with – in this image
they are the relative size of known objects in relation to
each other (Diminishing Perspective) & Linear Perspective and reaches a conclusion: depth!
Linear Perspective
Linear perspective refers to the phenomenon of what may in real life be parallel lines to seem to converge to a point as they recede from one’s viewpoint. The process of convergence invariably leads to diagonal lines which we discuss in the next topic. Also, no discussion on linear perspective is complete without stressing upon the role played by the lens one employs in the process of making such images; a wide lens (one with a short focal length) tends to accentuate the illusion of depth by exaggerating diagonals in the foreground. Telephoto lenses (those with a larger focal length) tend to “compress” distance by reducing diagonals and the impression of depth.
While I include an image below that exemplifies linear perspective, it would be worth your while to check the image “Tibet: The Changthang” (and others in this post) as an exercise to recognise linear perspective when you see it. At this point, it is also important that you be aware that lines will seem to converge only as they recede from the camera’s viewpoint; lines parallel to the plane of the camera are not affected.
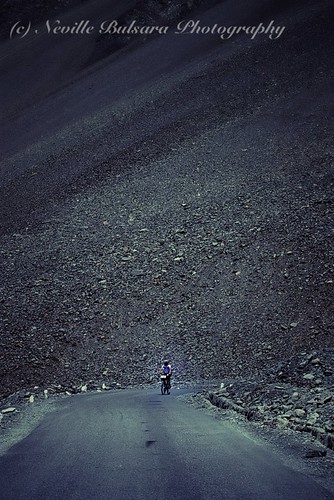
Ladakh: A cyclist rounds a bend on the Baralacha-la on the way to Leh
Linear perspective results in the parallel lines of the edge of the road seem to converge.
Couple this along with the use of Diminishing Perspective, Tonal Perspective and
Selective Focus (all used in the making of this image), and it spells ‘Depth’
Diagonal Lines
As we’ve already seen the illusion of convergence (which by its very definition needs at least two lines) resulting from Linear Perspective results in diagonal lines. Diagonal lines – as a matter of fact, even a single diagonal line – in an image result in a sense of movement over time. This in itself creates the illusion of depth, as the eye is drawn into the scene along a clearly defined path.
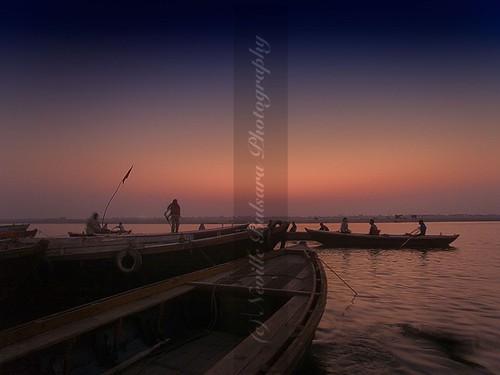
Varanasi: Dawn on the River Ganges
The strong sweep of the diagonal lines of the boat in the foreground
results in the viewer beginning his visual exploration of this image starting from
the bottom-left quadrant. The diagonals then lead him along them further into
the image; this journey is accentuated by the actual convergence of the diagonal lines
of the boat. The impression of depth is further enhanced by the use of
aerial and diminishing perspective.
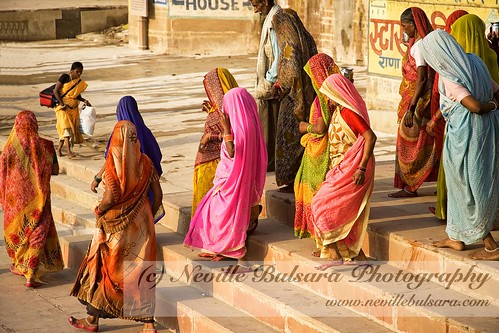
Varanasi: Women in bright colorful saris at the river ghats
There are two sets of diagonal lines at play in this image; both convey movement.
The first diagonal is that of the row of steps, it conveys movement starting from the
bottom-right edge of the frame and exiting from the left-middle of the image.
Given that we normally equate the bottom of the frame as being
closer to us than the centre and the top, this diagonal ends up aiding
our perception of depth, especially when our senses register the other visual clue
that helps in the process – the diminishing perspective of the woman walking
towards the camera.
The second diagonal is that of the line of women; it conveys movement from
the top-right of the frame towards the bottom-left. Its interception with the
first diagonal (that of the steps) adds tension to the image, and completes
our perception of movement over time. As a matter of fact, this whole image is
all about movement – the colors overpower our senses, drawing our attention to
them first. Our eyes follow this diagonal down and to the left to the intersection
with the diagonal steps. Our eyes then – guided by our mind – literally travel the
path taken by the ladies. This is an example of how one can create the illusion of
the fourth dimension in photography: Time.
Color Perspective
Colors on the warm end of the spectrum – reds, oranges and yellows – are perceived by the mind as advancing (moving to the foreground), while those on the cooler end – green, blue, cyan and violet – are experienced as receding. Offsetting a warm color against a cooler one immediately creates an optical illusion of depth. Of course, this can be further enhanced by the deliberate use of other methods discussed in this post.
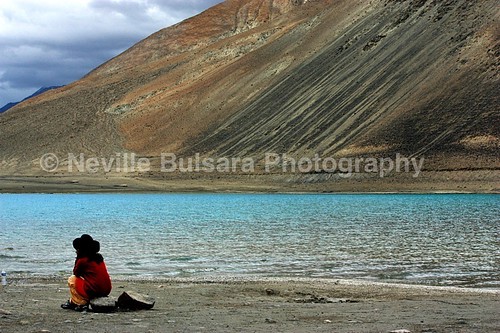
Ladakh: Lake Pangong-tso
Devoid of any other visual clues that imply depth (read that as any other perspective), it is only the
offsetting of red against blue that gives some sense of depth to this image
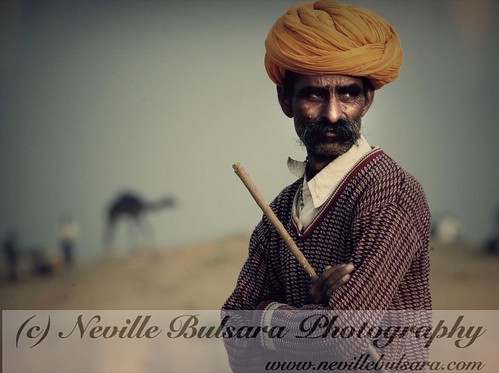
The Pushkar Camel Fair: A camel herdsman
Note how the warm hues of the turban seem to advance, while the cooler blues of the sky
seem to recede. Offsetting one against the other creates the illusion of depth, further reinforced
by the use of Diminishing Perspective and Selective Focus

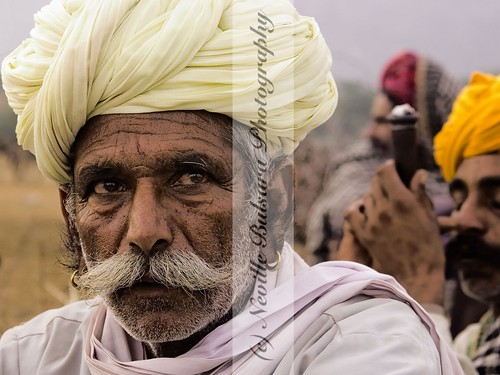
The Pushkar Camel Fair: Catching up on the latest gossip
While both Diminishing Perspective and Selective Focus are used here to reinforce depth, a very major part of the illusion is created by the warm colors of the turbans on the left. The visual lue is subtle, but it is the most important one used in this image
Selective Focus
Think about it – when are things sharp and clearly defined? When you are close to them. And what is ‘close’ but a term on the opposite end of ‘far’? Close and far both are terms related to depth, and when part of an image is sharp and clearly defined in contrast to other things, the mind automatically relates this sharpness with depth.
To achieve this we selectively focus on parts of the image which we want to be sharp and clearly defined. We make use of relatively wide apertures to selectively throw other things in the background (or at times foreground) out of focus. The overall impression in the image is depth, which of course can be reinforced by other clues.
The Pushkar Camel Fair: Portrait of a trader
This image relies entirely on the use of selective focus to convey depth; our mind equates the blurred people in the background to be behind trader in the foreground who is in sharp focus.
Tonal Perspective
Lighter tones seem to advance, while darker tones seem to recede. Offsetting a lighter toned object against a darker toned backdrop or object will make the lighter toned object stand out, creating an impression of depth.
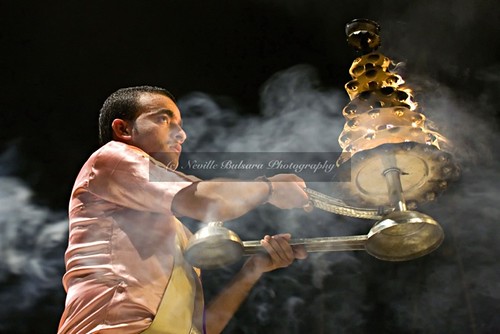
Varanasi: A young priest conducts a religious ceremony
Note how the dark background makes the lighter object (the priest) stand out and creates a sense of depth
In ending
I hope this post helps you further in your pursuit of learning the tricks that go into making better travel images. We discussed (with images) the various means to create a sense of depth in images, and again I’d suggest that you revisit each of the images here and identify for yourself the various means employed to get the desired results. Lastly, I’d like to state that just knowing the means is not enough; you have to see these elements in the real world before you trip the shutter! You have to recognise them for what they are and make conscious decisions about how you will make best use of them in the frame. This involves walking around a scene that may present itself. Learn to see, learn to explore, learn to slow down. It is only then that you make images rather than take them!
—
Follow me on Facebook to keep yourself abreast on my upcoming photography workshops in India where I teach this and a whole host of other travel photography related subjects.
Like this post? Feel free to share it! I especially appreciate G+, Facebook & Twitter shares; please click the symbols below to share it on the platform of your choice. Thank you!
About

Photographing the very best of India, and helping visitors to India discover and photograph the best that India has to offer since 2004. Still loving every moment of it!
—
I am a professional travel and documentary photographer based in Mumbai (Bombay), India. While not shooting on assignment, I conduct photography workshops, photo tours & expeditions to some of the most exotic locations in India.
I started my formal education in photography over two decades back when I joined the then photography club in my school. Having soon learned – amongst other things – how to develop and print his own photographs, I set up a clandestine darkroom at home to further (what I then thought to be) my future darkroom career.
An unfortunate incident leading to he spillage of developing chemicals onto an expensive table (which promptly took the varnish off) resulted in my secret cache of developing fluids, fixing salts, printing papers, zero watt bulbs & enlarger (I still can’t understand how I managed to keep the enlarger hidden fer chrissake, those things are bloody bulky!) being discovered by my parents. Thus was a budding darkroom career nipped in the bud.
Following this, I took a sabbatical from all things photographic, focusing my energies in the Information Technology field. From 1988 through 1995, I focused my energies on establishing and heading what went on to become India’s leading Computer Anti-Virus & Network Security company. I describes this period of my life as “financially rewarding, but overly strenuous on the left, logical side of my brain, while totally ignoring the right, creative, artistic side.”
Taking to photography again in 1995, I’ve traveled extensively all over India and the world. Having sold my company earlier, I finally chose to step down from his position there as CEO, and focus all my energies on professional travel & documentary photography. Since then I have worked on several assignments for magazines that showcase my work.
While not shooting on assignment or researching future destinations, I lead Photography Workshops, Photo Tours and Expeditions in India. Needless to say, I am intimately familiar with all of them, whether they be Rajasthan, Ladakh, or Varanasi – to name a few.
With a flair for simplifying the most complex subjects – photographic or otherwise (an offshoot of my teaching background), I love sharing the wealth of photo-ops that abound in India with the participants of my Workshops, Tours & Expeditions.
